How to bond granite pieces together
How to Join Granite Together as a Professional
Granite is one of the strongest natural materials we have available for use in buildings, flooring, & countertops. The only way to create a permanent & strong joint between the two pieces of granite will be achieved through following three main principles: correct type of granite adhesive; surface prepares correctly; install correctly. This guide will provide all of the essential information to successfully bond granite & discuss methods/ materials for bonding granite in both residential settings & commercial applications.
Adhesive is the most critical factor in creating a successful bond between pieces of granite. It is essential that you do NOT use “general-purpose” adhesives because that type of adhesive typically does not last long when applied to granite – AND can DRAMATICALLY change the color if it spills onto exposed granite. There are 3 (three) types of adhesives made to specifically bond granite which I would recommend:
1. Two-Part Stone Epoxy – this adhesive is by far the best for bonding granite. Not only does it provide a very strong bond, once cured is waterproof, resistant to most chemicals & changes in temperature, it will also fill ALL voids up to 3 millimeters.
2. Polyurethane Adhesives – Bonding applications of this type typically occur where they will be used outside or in applications requiring flexibility.The water-resistance of this adhesive is good but not as strong as that of an epoxy adhesive.
3. This is an adhesive made specifically for attaching small decorative, non-load bearing granite objects together; you must first check the compatibility of this adhesive with the surface you wish to attach before using it.
If you plan to use this adhesive to attach load bearing granite pieces, such as granite countertops or large slabs of granite to the wall, use a two-part epoxy that conforms to JC 887 stone adhesive standards and has a minimum shear strength of 10 MPa.
In order to have a reliable bond between the two adhesives, the surfaces of the granite being bonded together must beDry Fit Test: Lay Out All The Pieces Of Granite You Will Be Using Together (Without Glue) So You Can Check To See If The Pieces Are Gapped/Flat/Aligned. You May Need To Use A Grinder To Level Out Any Uneven Edges On The Granite. Any Gaps That Are Larger Than 3Mm Should Be Filled With Epoxy Material Before You Use The Adhesive.
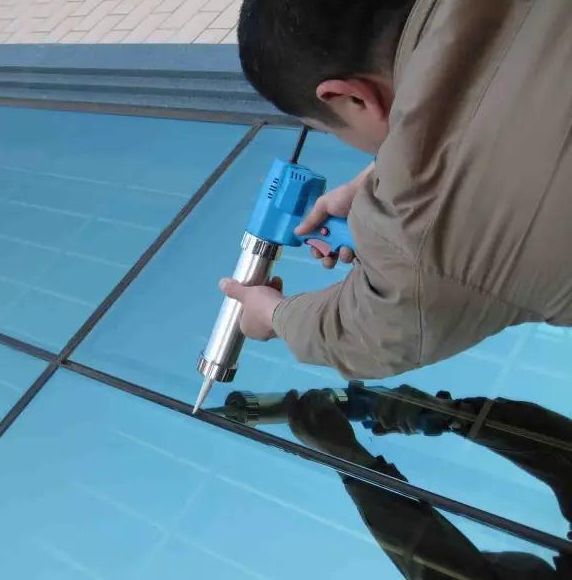
3. Adhesive Application And Bonding Procedure: To Achieve A Good High Strength Bond There Are Five Basic Steps To The Proper Adhesive Application And Bonding Procedure.
1. Mixing The Adhesive Properly: With Two-Component Epoxy You Must Follow The Directions Provided By The Manufacturer Exactly When Mixing The Resin And Hardener Together (Usually 1:1) By Weight. You Must Also Mix For 2 – 3 Minutes. You Will Need To Use All Of The Mixed Adhesive Before The Working Time Is Complete (5 – 30 Minutes).
2. Spreading Adhesive: The Adhesive Must Be Spread Out Evenly In A Thin Uniform Layer Of 2 – 3Mm Thick On One Or Both Surfaces. It Is Best To Use A Notched Trowel To Spread A Thin Layer Of Adhesive On The Back Side Of The Larger Slabs To Ensure That You Have Complete Adhesive Coverage. Avoid Spreading Too Much Adhesive To Prevent Excess Adhesive From Squeezing Out Besides What Is Necessary.
3. Align And Clamp: Align The Two Pieces Together And Press Firmly Together, Then Use Clamps To Hold Them Together In A Non-Moving Position With Heavy Weights To Secure The Pieces While The Adhesive Is Curing.Place Protecto Pad Between Clamp And Granite Surface To Prevent Scratching On Surface Of Granite As Well As To Create An Equal Amount Of Clamping Force That Will Help Prevent The Stone From Moving While Curing.
4. Remove Excess Glue Immediately: After Clamp Is Tightened, Clean Up Excess Glue That Has Squeezed Out Of The Joint With A Damp Paper Towel Or Plastic Scraper Before It Gets A Chance To Cure To The Stone. Once The Glue Has Cured (About 10-15 Minutes), You Will Have A Difficult Time Getting It Off Without Damaging The Stone.
4. Bond Curing Time: The Time That It Will Take For The Bond To Cure Will Vary Depending On The Type Of Adhesive Used And The Ambient Temperature So Do Not Apply Stress To The Bond Until After The Bond Has Fully Cured.
–Natural Stone Epoxy (100% Cured) At 15°C To 25°C (Room Temp) Curing Time 24-48 Hrs After Which No Movement Or Loading Should Occur. Wait 48 Hours Before Moving Or Loading Item For Maximum Strength./Polyurethane Adhesives Curing Time 24 Hours To 72 Hours Depending On Ambient Temperature. Polyurethane Adhesives Should Not Be Exposed To Moisture While Curing. Curing Temperatures For Most Adhesives Will Be Greater Than 5 Degrees C. Therefore Do Not Make The Joint When It Is Cold.What To Do After Sealing and How Long Can it Last
After completing the curing process for your granite, remove any clamps or brace support from the granite surface. Any remaining adhesive still on the granite can be easily wiped off using a cleaner specifically designed for use on natural stone surfaces, or diamond polishing pads to create a finished joint that is nearly impossible to see. Long-term performance of the bonded joint can be maximized by avoiding excessive heat, excessive shock, and using acidic cleaners around joint areas.
Key Safety and Quality Guidelines
• Before applying glue to your granite, always test it on a will not be seen edge or corner of the granite to make sure that it does not stain the granite.
• Always work in a well ventilated area when rticles made from granite to help eliminate any vapours from the glue.
• Outside, or if you are bonding large slabs of granite and will be working in wet or damp conditions use waterproof adhesives and waterproof joint sealants.
• When working on bonding larger and thicker pieces of granite always consider using mechanical fasteners with an adhesive to improve the overall strength of the bond.
Following the above listed procedures on bonding granite will provide you with a high solid high quality permanently bonded joint, which will maintain the original durability and appearance of the granite, regardless if it is being used in a residential setting or a commercial setting.
Granite is a high density stone that is extremely solid and is used for countertops, floors, & exterior and interior cladding all around the world. For a secure and solid bonded joint you need to use adhesives safe for natural stone, perform proper surface preparation and apply the adhesive correctly. The following is a list of steps and considerations used when mounting granite counter tops whether it is done by a DIY individual or a professional in several different manners.The Best Adhesives for Given Granite Bonding
The best options for bonding together two granite surfaces so that they create a strong connection without any visible edges are as follows:
– Epoxy: The best glue for bonding granite to granite is a two-part epoxy adhesive. The bond will be stronger than any other type of adhesive, it is resistant to moisture, chemicals, and heat and will fill in gaps that are up to .118″ wide. Be sure to look for a natural stone-specific epoxy so that it does not stain the granite.
– Polyurethane: Another viable option for bonding granite to granite is urethane unless it will be bent or flexed due to its applications (e.g. exterior cladding). Polyurethanes are both waterproof and can withstand weather, but do not have the same ability to hold as an epoxy.
– Specialty/Stone Adhesive: Specialty adhesives can successfully bond decorative pieces or stone elements together; however, they are not approved for applications where the stone will bear weight. Always ensure that the adhesive states “Compatible with Granite” on its label and does not stain or weaken your bond.
Use your two-part epoxy and ensure that the adhesive you buy has been tested and approved by the general industry standard of JC 887 for Adhesives for Stone, along with having a shear strength greater than 10 N/mm2 for use in heavily loaded areas such as kitchen countertops or large wall panels.
2. Prepare the Surface of the Stone
Properly preparing the surface of each granite piece you will bond is crucial in order to create a strongUsing granite in a project means use the appropriate surface preparation or cleaning methods to gain maximum adhesion when using adhesive; surfaces must be clean and lightly roughened before applying adhesive in order for the adhesive to have an adequate “template” to which it A. Cleaning of the bonding surfaces (before applying adhesive) should take place before use ; they should be cleaned by using the appropriate degreaser/cleaner specifically designed for cleaning stone surfaces to remove dust, oil, grease, or any previous adhesive that may exist on those surfaces. If cleaning agents such as bleach were used on the bonding surfaces, they may cause permanent staining or discoloration that probably would not allow for sound bonding of granite; therefore, the surfaces must be wiped dry using a lint-free cloth (with the exception of the under-side of one surface). After the surfaces have dried completely, check to make sure that one of the bonding surfaces was not contaminated with moisture due to condensation or other reason; this could prevent sound bonding.
2. Create an uneven surface on each of the granite bonding surfaces by either lightly sanding each bonding surface (using either a diamond grinder or sandpaper) until they have been sufficiently roughened to allow for rapid setting of adhesive between them (and so that the adhesive can adhere to them once it has set). Sand all bonding surfaces, then use a clean and dry towel to wipe dust off bonding surfaces to avoid re-contaminating the bonding area with dust when applying adhesive.
3. Assemble/bonding pieces of granite together : once all of the bonding surfaces have been processed by cleaning and roughening, lay/assemble pieces of granite together to ensure proper fit (i.e., even edge heights, no gaps or voids, and proper alignment) prior to applying adhesive ; gaps between adjoining pieces that are greater than 3 mm will need to be filled with epoxy (if used) prior to applying adhesive.
4. Applying adhesive and building a bond : follow these procedures to ensure proper application of adhesive, minimization of waste, and creationMixing Adhesive (two-part epoxy): If you’re using a two-part epoxy adhesive, you will need to follow the manufacturer’s instructions on mixing the resin and hardener (1:1 weight ratio) using a clean mixing tool. You should mix thoroughly for 2-10 minutes until all of the material has turned to one colour. Mixing incorrectly may result in a weak bond. Only mix up what you think you will be using over the period of time you are going to be using the adhesive.
Applying Adhesive: Use a small notched trowel or putty knife to apply a 2-3 mm thick coat of adhesive to the surface of one or both pieces. For larger granite pieces, a notched trowel should be used to create ridges in the adhesive (as this will ensure that the adhesive will have complete covering on both surfaces when they contact). Do not over apply the adhesive because excess will come out and will be difficult to clean up once the adhesive has cured.
Aligning and Clamping: Hands on either side of the granite, ensure that both pieces are perfectly aligned and apply pressure to bring both pieces together. Apply clamps or heavy objects to attach the two pieces; be sure to distribute the weight evenly on both pieces so that movement does not occur from the pressure. Place a protective pad (e.g., foam or cloth) above and below the granite pieces where the clamps are located to help prevent any scratching of the granite surface when clamping together. If you need to adjust alignment within the adhesive “open” time frame, do so.Excess Adhesive should be removed by wiping it with a damp cloth or scraping it off with plastic immediately after clamping time as removing it when the adhesive has set will be much more difficult (the standard set time can range from 10 – 15 minutes) and can damage your surface of granite.
4. The time it will take for the adhesive to cure depends on the type of adhesive used as well as weather conditions (temperature and humidity). See the following guidelines:
• Epoxy – For the adhesive to fully cure at room temperature (15 – 25 degrees Celsius) 24 to 48 hours after removing the clamps (don’t move or put any pressure on them during this time). With fast curing epoxy, full hardness can be achieved within 12 hours; however, it is recommended to wait 48 hours for the strongest bond.
• Polyurethane adhesive – 24 to 72 hours to completely cure depending on the temperature where the adhesive is applied (the adhesive must not get wet during the entire cure time).
Note: Cold temperatures (below 5 degrees Celsius) can prolong the cure time of most adhesives; warmer, drier conditions will shorten the cure time for most adhesives.
5. Final Finishing and Care:
Once the adhesive has completely cured, remove the clamps from each piece and use a stone-safe cleaner to clean off the glass/clamped area. To create a joint that matches the original surface texture of the granite, use a diamond polishing pad to polish the joint. To maintain the bond, do not subject the joint to excessive heat, impact or solvents (i.e acid based cleaners).
Tips for Success
• Always test the adhesive somewhere on the granite that will not be visible to see if possible stains occur.
• Use adhesive in a well ventilated area for proper inhalation of fumes when working with epoxy and/or polyurethane.
• When using waterproof adhesives for exterior or wet applications (such as countertops in bathrooms), ensure the joint is properly sealed to help minimize or keep moisture from penetrating through the joints.
• For large or heavy pieces of granite, always use a mechanical fastener (i.e angle brackets) with adhesive for extra stability with the exterior or against the vertical application of high-rise buildings.
Taking into consideration all of the above mentioned steps will give you an extremely strong, invisible bond between your pieces of granite and will enhance the pleasant appearance and longevity of granite for use in either residential or commercial applications.